
Eat Your Own Dog Food: distribute a beta version of your iOS app using Apple Enterprise Developer Program
·
In this post I will show you how to distribute a beta version of your iOS app using Apple Enterprise Developer Program.
In a previous post I talked about the "app relaunch" project I was involved in the last few months at lastminute.com group. During one of the last sprint before the release we started to think about putting in place an internal beta testing program to have more testing data and eventually discover more bugs before the release on the App Store (we really wanted to eat our food 😄). We thought about using the TestFlight environment with external testers. But this solution didn't work for us because:
- we wanted to let everyone in the company be able to install the beta version without the need for any kind of registration. The external testers in the TestFlight environment must be registered in the "External Tester" section of you app in the App Store Connect (someone said iTunes Connect?!?!?! 😝).
- we wanted to associate the beta with a new bundle id so that we could have a custom monitoring section in the Fabric dashboard.
- we didn't want to go through the "light review" that Apple does each time you want to distribute a new build to your external tester. We also wanted to avoid the slow processing timing of TestFlight.
So what do we did? We put in place our custom Beta distribution program using Apple Enterprise Developer Program. By enrolling in this program you have the ability to distribute you app inside your company without the need of the App Store. You can basically create your own Company App Store!! 😮 I worked on the creation of this custom internal Beta distribution program with my colleague Giordano Tamburrelli. Giordano is the Team Leader of the Lynch Team, the agile team where I work at lastminute.com group. He has a Phd in Computer Science at Politecnico di Milano university and a master degree in Computer Science at the University of Illinois. He is one of the most skilled person I ever met, both from a technical and managerial point of view (yes you know, I'm just kissing his ass 😘😝). Obviously, he is also one of the biggest nerd you could ever met 💘💖. So how did we decide to proceed? We basically did the following operation to put in place our beta program:
- Create a new bundle identifier and a new provisioning profile in our enterprise account.
- Create inside our app a new configuration with some customization for the Beta build.
- Add some new scripts to automatize the creation and the upload of new beta ipa using Fastlane, Jenkins (CI), maven (for the upload) and Nexus as our repository manger (we already use all these platforms for the distribution of our release version and to store development snapshots of the ipa).
- Put in place a mini website, configured specifically for the distribution of the beta app.
To show you the details and some screenshots of the operation we made I will use a sample project SampleBetaApp with
bundle identifier it.chicio.SampleBetaApp.
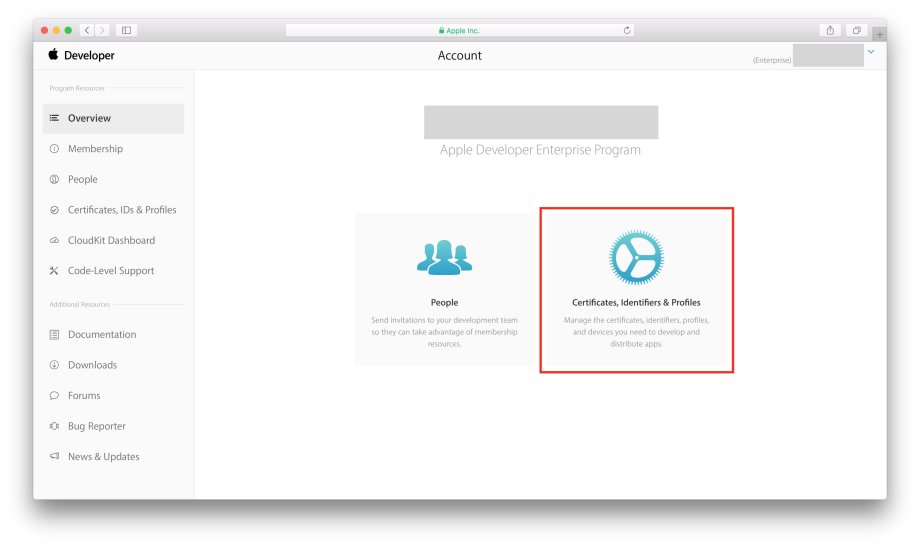
Let's start from the first step: configuration on the Apple developer account for our new enterprise program. As already
explained before, we decided to create a new bundle identifier for the beta app and obviously a new provisioning
profile. The procedure is basically the same of the standard program for both the bundle identifier and the provisioning
profile. We just need to follow the instruction in the Apple Developer Account site in the section "Certificates,
Identities & Profiles" (and maybe there's a high chance that, if you're reading this post you already release at least
one app on the Apple app store so you already know the stuff to do 😏).
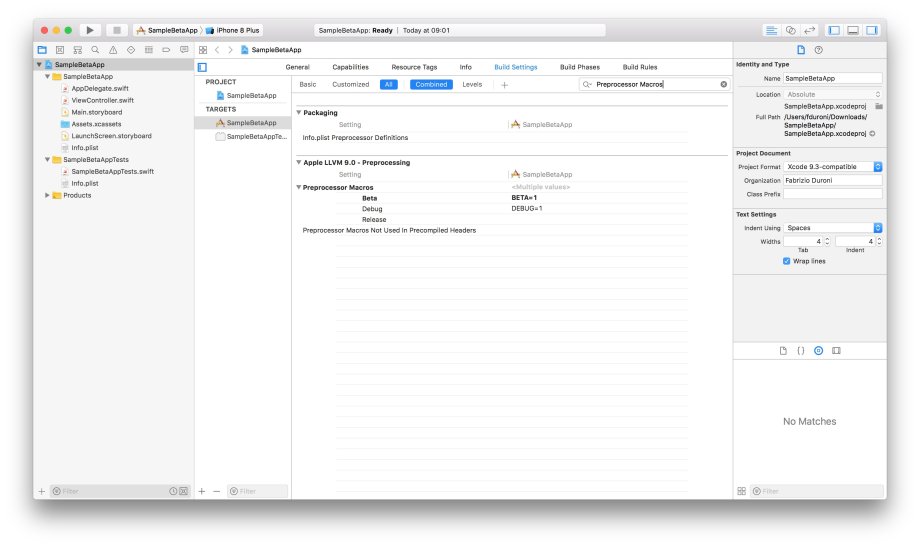
After that we created in our iOS project a new Beta configuration by duplicating the release one. In this way we were able to generate an ipa similar to the release one and were also able to customize some settings of our app.

The Build Setting that we customized are:
- Obviously the bundle identifier. Here we used the one created in the first step (Apple Enterprise developer Account configuration). The entry that we modified in the Build settings is named "Product Bundle Identifier".
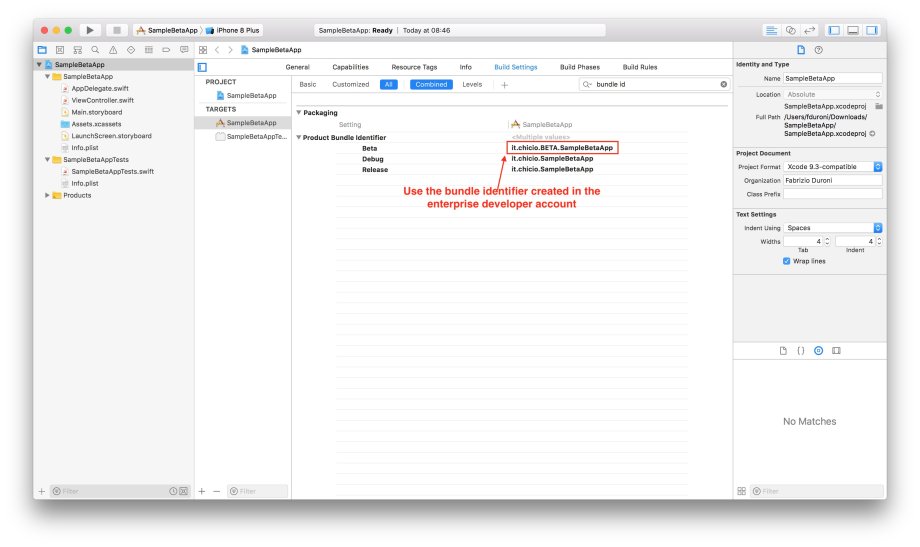
- The app icon. You can add a new asset in your main assets catalog. The entry that we modified in the Build settings is named "Asset Catalog App Icon Set Name".
- We added a new custom preprocessor macro in the "Preprocessor Macros" build setting to be able to detect in our source code that we are running a beta version and eventually do some custom stuff. For example we added the build version number in the about section only for the beta version. In this way our tester were able to tell us exactly which version they were using. This macro is visible only to Objective-C. If you need to do the same thing in Swift you need to customize the "Other Swift Flags" field.
Then we created the scripts needed to automatize the build on Jenkins and the upload of our artifacts repository to Nexus. As I said before we were already using Fastlane to automatize the releases of our app to the store. For the beta publishing process we decided to create a new lane in our Fastfile where we launch a custom script to do all the operation needed to publish our beta.
lane :create_beta_ipa do |options|
  sh './scripts/build_beta.sh'
end
As you can see below, in the script build_beta.sh we do three things:
- We generate an archive of our app using the
xcodebuild archivecommand using the Beta configuration we created before. We customized some other options. For example the archive path. At the end of this command we obtain a file namedSampleBetaApp.xcarchivein the folder<project root>/DerivedData/Beta. - Then we exported the ipa by using the
xcodebuild -exportArchivecommand. This command needs andexportOptionsPlistfile that contains some exporting options, including the provisioning profile name that must corresponds to the name of the provisioning profile we created at the beginning in the Apple Enterprise Developer account. Below the script you can find theexportOptions-SampleBetaApp.plistsample file for theSampleBetaAppproject. - Last but not least, when the ipa is ready we upload it on Nexus using Maven (in the script below you can find some placeholder for some of the parameter used 😉). The command is simple and clear: we are uploading our artifact, the ipa, without generating any pom version. One important thing to note: we use always 1 as version, because we decided that we don't want to store the beta versions history. We just want to keep the last one we publish.
#!/usr/bin/env bash

TARGET="SampleBetaApp"
DERIVED_DATA_BETA_PATH="../DerivedData/Beta/"
BETA_TARGET_PATH=$DERIVED_DATA_BETA_PATH$TARGET
XARCHIVE="${BETA_TARGET_PATH}/${TARGET}.xcarchive"
IPA="${BETA_TARGET_PATH}/${TARGET}.ipa"

xcodebuild -workspace ../Container.xcworkspace
            -scheme "$TARGET"
            -sdk iphoneos
            -configuration Beta
            archive -archivePath "$XARCHIVE"

xcodebuild -exportArchive
            -archivePath "$XARCHIVE"
            -exportOptionsPlist "exportOptions-${TARGET}.plist"
            -exportPath "$BETA_TARGET_PATH"

mvn deploy:deploy-file -DgroupId="<group id project identifier>"
                        -DartifactId="$TARGET"
                        -Dversion=1
                        -DgeneratePom=false
                        -DrepositoryId=nexus
                        -Durl="<nexus repository url>"
                        -Dfile="$IPA"
<?xml version="1.0" encoding="UTF-8"?>
<!DOCTYPE plist PUBLIC "-//Apple//DTD PLIST 1.0//EN" "http://www.apple.com/DTDs/PropertyList-1.0.dtd">
<plist version="1.0">
    <dict>
        <key>method</key>
        <string>enterprise</string>
        <key>signingCertificate</key>
        <string>iOS Distribution</string>
        <key>provisioningProfiles</key>
        <dict>
            <key>it.chicio.BETA.SampleBetaApp</key>
            <string>SampleApp Beta Distribution</string>
        </dict>
    </dict>
</plist>
At this moment we were ready to create the new Jenkins job to build our beta. We decided to trigger it using Jenkins
webhook triggers. In this way we were able to trigger the build and release of a new beta by just calling an url. This
job basically clone our app repository and then execute the lane create_beta_ipa that we defined before in the
Fastlane Fastfile.
So in the end with all this steps above we obtained an ipa reachable at a public url (on Nexus). We decided to publish
our beta using Github Pages (the same service that runs this website ♥️). Why? Because we needed a server with
HTTPS already configured. Github pages let us create the beta website really fast. So we created a new account and
published a new html that contains the following code:
<html>
<head>
</head>
<body>
<p>
  <br />
  <br />
  <a href="itms-services://?action=download-manifest&url=<a base url>manifest.plist">
<p>Install the SampleAppBeta app</p>
</a>
</p>
</body>
</html>
As you can see above, in this html there's a special link with the protocol itms-services. If a user clicks on this
link from Safari browser on a iOS device, the download and the installation of the app will starts. If you look
carefully at the content of the link above, you will notice there's a reference to a url of a manifest.plist file.
This is a file generated by Xcode if you export an archive with an enteprise certificate and contains some metadata for
the ipa, including the location/url of the ipa to be downloaded. In our case this url was the Nexus link to the ipa.
This file can be generated the first time and eventually edited if there's any change. This is a sample manifest file
that could be used for our SampleBetaApp.
<?xml version="1.0" encoding="UTF-8"?>
<!DOCTYPE plist PUBLIC "-//Apple//DTD PLIST 1.0//EN" "http://www.apple.com/DTDs/PropertyList-1.0.dtd">
<plist version="1.0">
    <dict>
        <key>items</key>
        <array>
            <dict>
                <key>assets</key>
                <array>
                    <dict>
                        <key>kind</key>
                        <string>software-package</string>
                        <key>url</key>
                        <string>http://www.example-url-to-where-the-ipa-is.com/SampleBetaApp.ipa</string>
                    </dict>
                    <dict>
                        <key>kind</key>
                        <string>display-image</string>
                        <key>url</key>
                        <string>https://www.example.com/image.57x57.png</string>
                    </dict>
                    <dict>
                        <key>kind</key>
                        <string>full-size-image</string>
                        <key>url</key>
                        <string>https://www.example.com/image.512x512.png</string>
                    </dict>
                </array>
                <key>metadata</key>
                <dict>
                    <key>bundle-identifier</key>
                    <string>it.chicio.SampleBetaApp</string>
                    <key>bundle-version</key>
                    <string>1.0.0</string>
                    <key>kind</key>
                    <string>software</string>
                    <key>title</key>
                    <string>beta-sample.com</string>
                </dict>
            </dict>
        </array>
    </dict>
</plist>
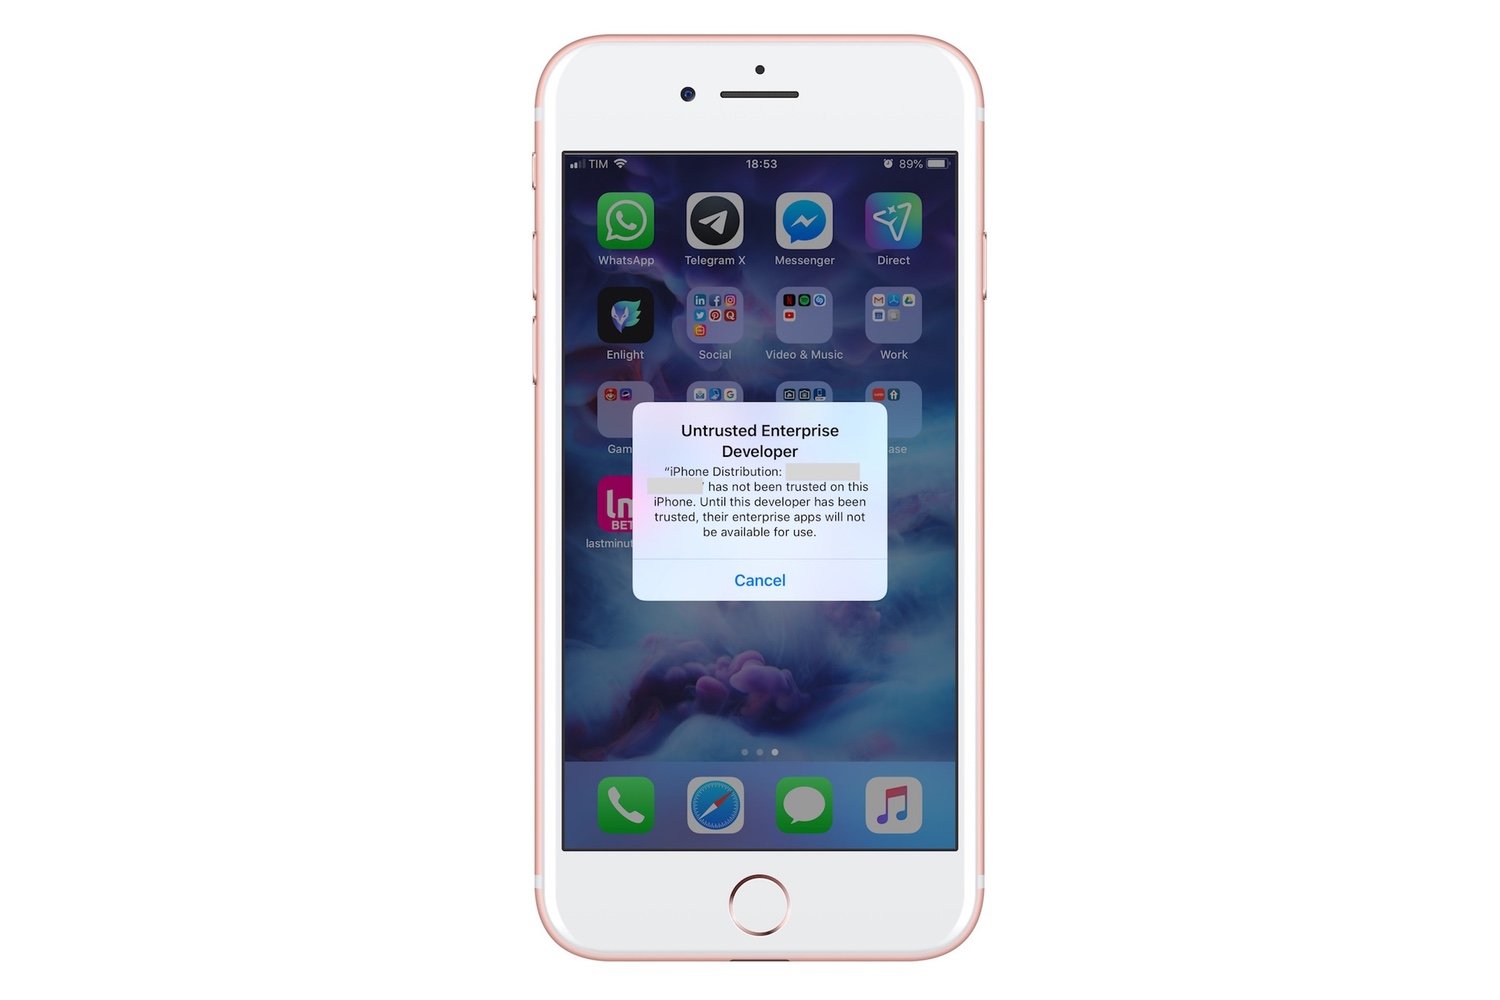
Now we were ready to distribute our beta app, and you know everything is needed to create your own beta program. One last thing: you will need to explain to the less experienced user that they need to accept the enterprise provisioning profile from Settings -> Profiles & Device Management. If they don't do it they will see the alert contained in the screenshot below.
That's it!!! Go to your boss and tell her/him you're ready to create you custom iOS beta internal program!!! : sunglasses:🍎
read next
Learn how to create stunning text with React Native using React Native Skia. In this post, we’ll explore how to leverage Skia’s powerful features to bring vibrant gradients to life.
iOS localization is a wild ride where device and app locales play by their own rules. Under the hood, Apple uses CLDR/ICU language distance matching to pick the best locale for your app. Let’s decode the madness together.