
Create a Swift library compatible with the Swift Package Manager for macOS and Linux
·
In this post I will talk about how to create a Swift library compatible with macOS and Linux.
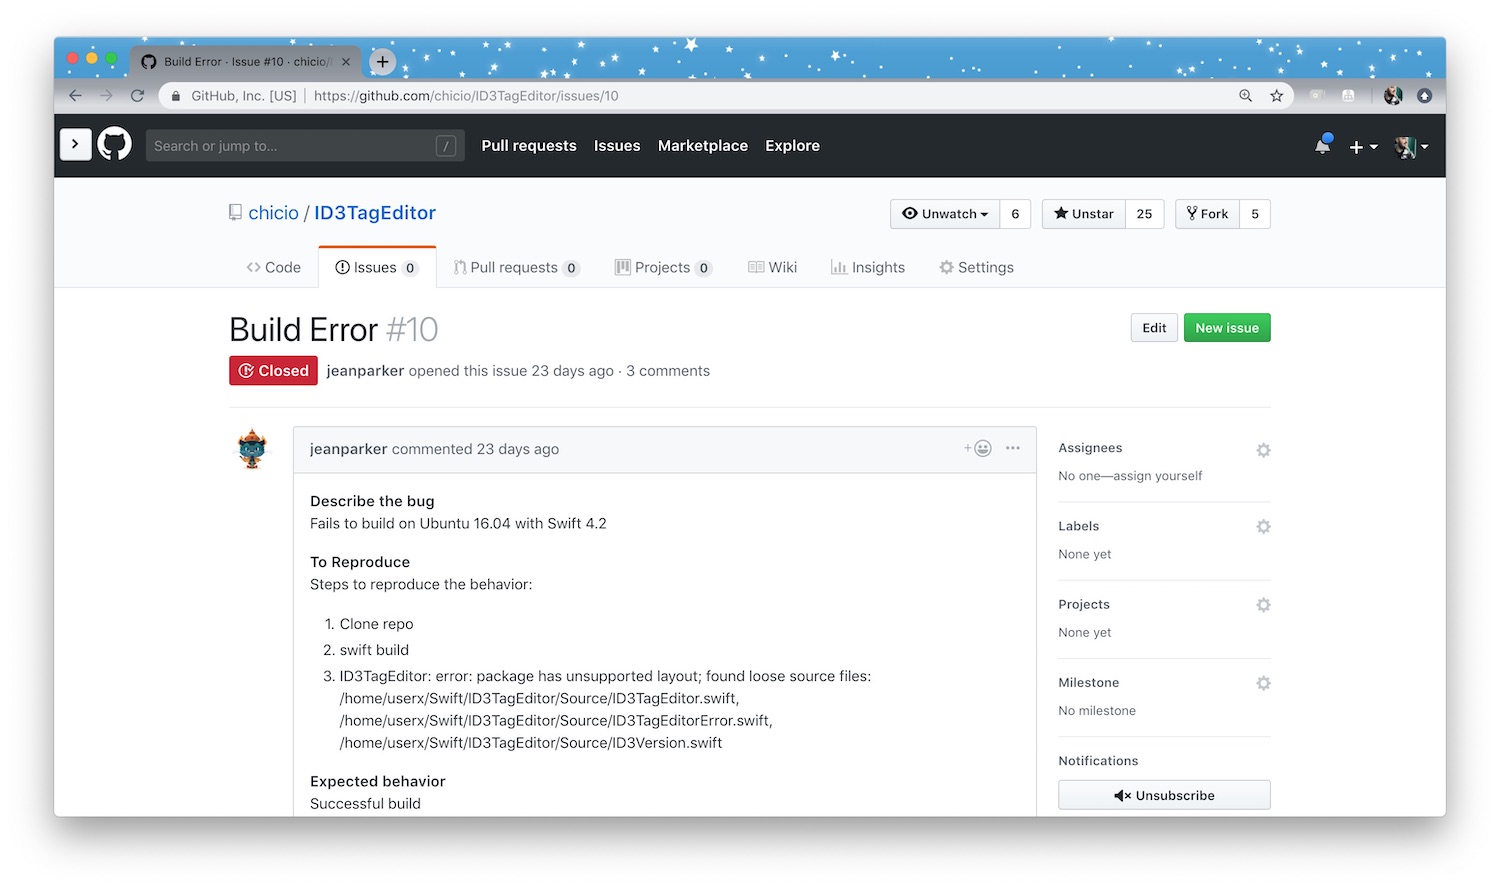
A few times ago I published ID3TagEditor, a Swift library to read and modify the ID3 tag of mp3 files (I described it in this previous post) . This library was compatible with iOS, Apple TV, watchOS and macOS. Then one day a user of my library opened a new issue on the library github repo with title "Build Error" and a description of a build error on Linux.
The library had a simple Package.swift, but honestly I never tested it with the Swift Package Manager (SPM) on Linux
nor on macOS 😅 (this was the only feature that I didn't test 😅). So I though: "It's time to add
full support for the Swift Package Manager to ID3TagEditor and port it also on Linux!!!!" 💖 In this post
I will describe how you can create a Swift library package for the Swift Package Manager compatible with macOS and Linux
for an existing project. Obviously, I will show you the entire process using
my ID3TagEditor as example.
First of all, if you are starting with a new library project, you will use the following SPM init command:
swift package init --type library
This command will create all the files and folders you need to develop your library. But in my case, I was working on an
existing project. This is why I created all the needed files manually and I will describe them in details so you can
understand better the meaning of each one of them.
The first file needed is the Package.swift. This file must be created in the root folder of your project. This file
contains some Swift code that defines the properties of the project using the PackageDescription module API. At the
moment of this writing there are 3 API versions of the PackageDescription API:
For my ID3TagEditor I used the Version 4.2 .
// swift-tools-version:4.2

import PackageDescription

let package = Package(
    name: "ID3TagEditor",
    products: [
        .library(
            name: "ID3TagEditor",
            targets: ["ID3TagEditor"]
        ),
    ],
    dependencies: [],
    targets: [
        .target(
            name: "ID3TagEditor",
            dependencies: [],
            path: "./Source"
        ),
        .testTarget(
            name: "ID3TagEditorTests",
            dependencies: ["ID3TagEditor"],
            path: "./Tests",
            exclude: [
                "Parsing/Frame/Content/Size/ID3FrameContentSizeParserTest.swift",
                "Parsing/Frame/Content/Operation/ID3FrameStringContentParsingOperationTest.swift",
                "Parsing/Frame/Size/ID3FrameSizeParserTest.swift",
                "Parsing/Tag/Size/ID3TagSizeParserTest.swift",
                "Parsing/Tag/Version/ID3TagVersionParserTest.swift",
                "Acceptance/ID3TagEditorTestAcceptanceTest.swift",
                "Mp3/Mp3FileReaderTest.swift"
            ]
        ),
    ],
    swiftLanguageVersions: [.v4_2]
)
Let's see in details the meaning of each option:
name, the name of the packageproducts, the list of all products in the package. You can haveexecutableorlibraryproducts. In my case I havelibraryproduct and for that I have to specify:name, the name of the producttargets, the targets which are supposed to be used by other packages, i.e. the public API of a library package
dependencies, a list ofpackagedependencies for our package. At the moment ID3TagEditor doesn't have any dependencies so I declared an empty array.targets, the list of targets in the package. In my case I have two target:ID3TagEditor, that is the main target of the library and is a classic.target. For this target you specify its name, its dependencies and the path to the source files. In my case I have everything inside theSourcefolder.ID3TagEditorTests, that is the.testTargetof the library. For this target I had to specify an additionalexcludeoption. The tests excluded contains some references to bundle resources, and at the moment of this writing the SPM doesn't support resource bundles.
swiftLanguageVersions, that contains the set of supported Swift language versions.
Next I had to create a XCTestManifests.swift file inside the Tests folder. This file contains an extension for
each XCTestCase subclass I included in my test target. This extension contains an array __allTest that exposes a
list of all my test methods inside my XCTestCase subclasses. At the end of this file you can find a __allTests()
function that pass all the test methods to the testCase() utility function. __allTests() and testCase are
available only on Linux platform (and in fact the __allTests() function is wrapped in a conditional
check #if !os(macOS)). Below you can see a part of the XCTestManifests.swift file for the ID3TagEditor library.
import XCTest

extension ID3AlbumArtistFrameCreatorTest {
    static let __allTests = [
        ("testFrameCreationWhenThereIsAnAlbumArtist", testFrameCreationWhenThereIsAnAlbumArtist),
        ("testNoFrameCreationWhenThereIsNoAlbumArtist", testNoFrameCreationWhenThereIsNoAlbumArtist),
    ]
}

extension ID3AlbumFrameCreatorTest {
    static let __allTests = [
        ("testFrameCreationWhenThereIsAnAlbum", testFrameCreationWhenThereIsAnAlbum),
        ("testNoFrameCreationWhenThereIsNoAlbum", testNoFrameCreationWhenThereIsNoAlbum),
    ]
}

extension ID3ArtistFrameCreatorTest {
    static let __allTests = [
        ("testFrameCreationWhenThereIsAnArtist", testFrameCreationWhenThereIsAnArtist),
        ("testNoFrameCreationWhenThereIsNoArtist", testNoFrameCreationWhenThereIsNoArtist),
    ]
}

//other extensions, one for each unit test class...
...

#if !os(macOS)
public func __allTests() -> [XCTestCaseEntry] {
    return [
        testCase(ID3AlbumArtistFrameCreatorTest.__allTests),
        testCase(ID3AlbumFrameCreatorTest.__allTests),
        testCase(ID3ArtistFrameCreatorTest.__allTests),
        ...
    ]
}
#endif
Next I created a LinuxMain.swift file in the root folder of my ID3TagEditor project. This file loads all the test on
Linux (using the functions and extensions defined in the previous XCTestManifests.swift file).
import XCTest

import ID3TagEditorTests

var tests = [XCTestCaseEntry]()
tests += ID3TagEditorTests.__allTests()

XCTMain(tests)
Now I was ready to test ID3TagEditor using the SPM on macOS and Linux. To do this I used Ubuntu as distro. The distro
version used at the moment of this writing is the 18.04 LTS.
First of all, how do I install Swift on linux? I downloaded the Swift release for Linux from
the Swift download page. The version I used is the one you can find
at this link
. Then I installed the additional packages clang and libicu-dev with the following shell command.
sudo apt-get install clang libicu-dev
Then I extracted from the archive previously downloaded the Swift release folder and I added to my shell environment
variable PATH the path to /usr/bin folder contained inside the this release folder.
tar xzf swift-<VERSION>-<PLATFORM>.tar.gz

//Add this to your shell profile file
export PATH=/<path to the Swift release folder>/usr/bin:"${PATH}"
The setup was done. Now I was able to test ID3TagEditor as a SPM library on Linux. To do this I created a new project
inside the demo folder of the ID3TagEditor project called Demo Ubuntu. This is an executable SPM project that
has ID3TagEditor as package dependencies. The executable is a command line application that opens a mp3 file, parses
its ID3 tag and print it to the standard output. To test my work I just cloned the ID3TagEditor on Linux (and also on
macOS 😜) and launched the following commands in the root folder of the Demo Ubuntu
project:
swift build
swift run
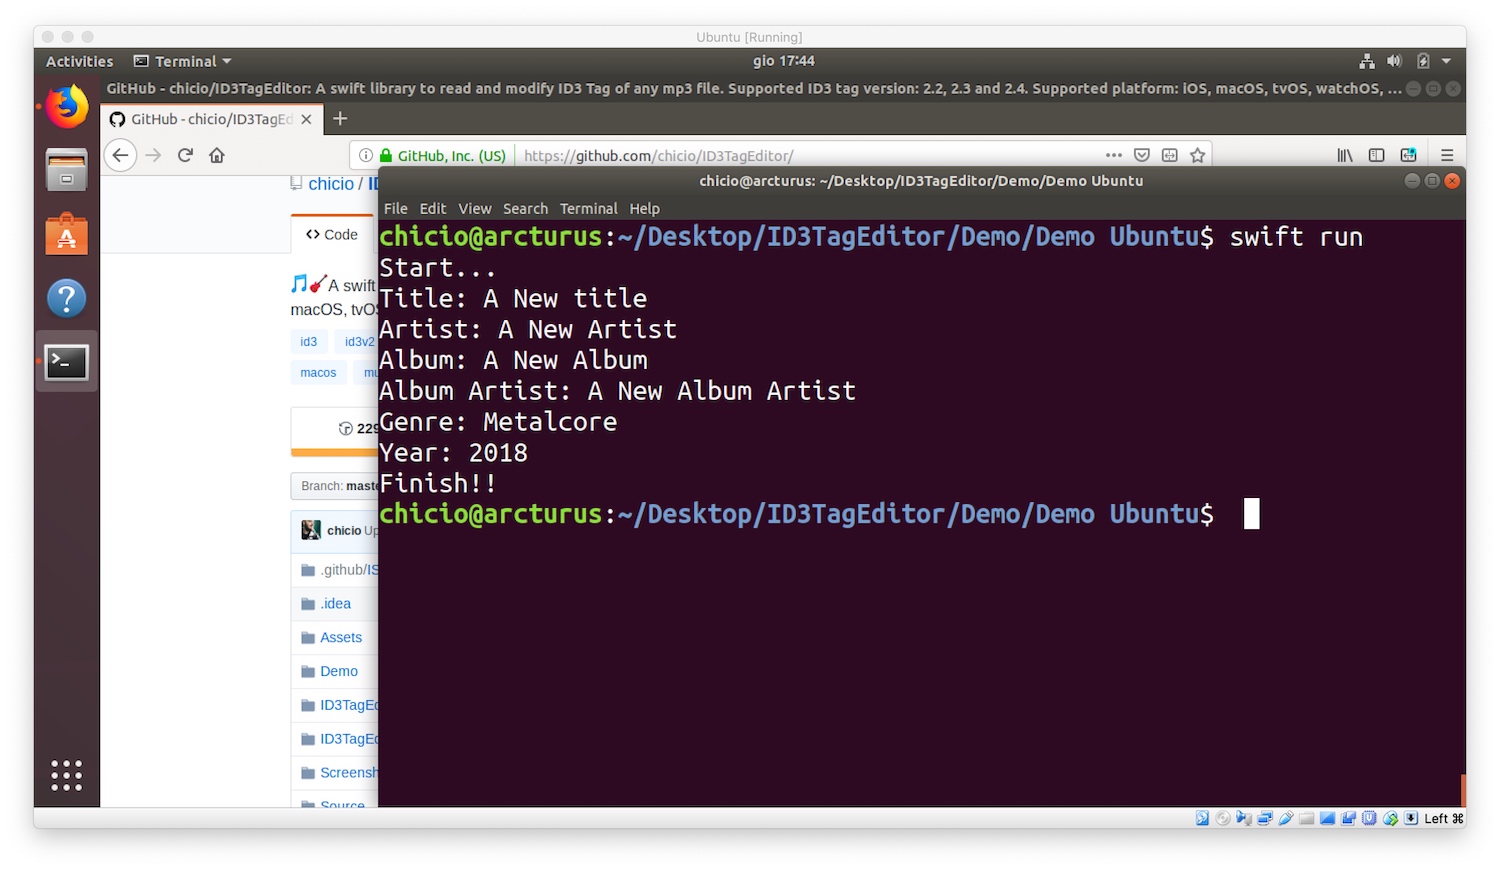
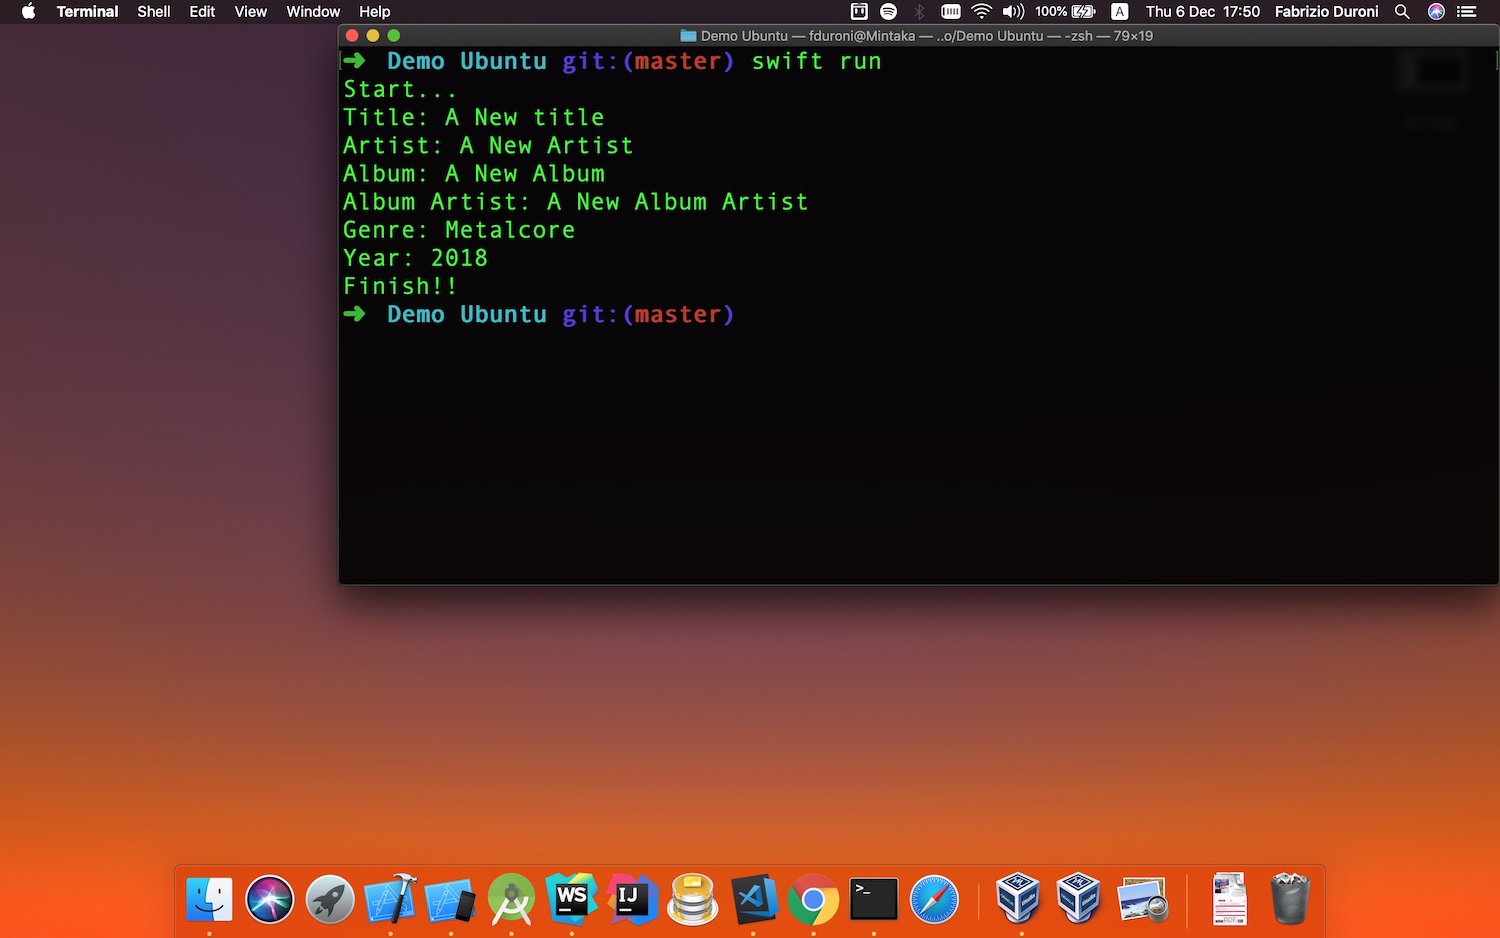
Below you can see some screenshot taken from both Linux and macOS that shows the final output of the demo Demo Ubuntu
after you execute the swift run command.
Cool! Now the ID3TagEditor is fully compatible with the SPM and could be used in Swift applications for both macOS and
Linux. You can see the entire codebase of the ID3TagEditor
in this github repository. Now you can start to port your libraries and
applications on Linux with the Swift Package Manager ✨.
Read next

