A physically based scene with three.js
·
In this post I will show you how to create a scene using three.js with support for Physically Based Rendering.
NB.: The scene described in this post is no longer available in production (due to a revamp of the entire website). You can find it in the old repository of this website or you can check the codesandbox created by Arthur Denner.
I love three.js. I think it's one of the most beautiful javascript and computer graphics library out there. Don't you know what three.js is? Let's see the description from the official github repo:
JavaScript 3D library. The aim of the project is to create an easy to use, lightweight, 3D library. The library provides canvas, svg, CSS3D and WebGL renderers.
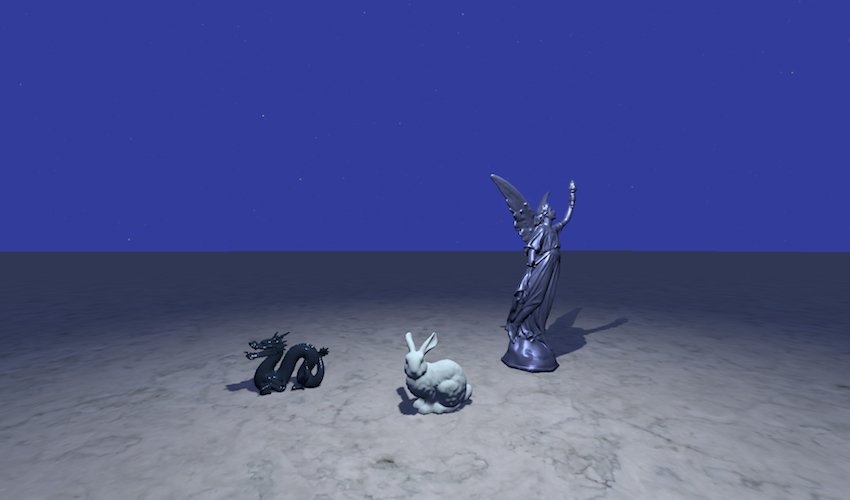
Simple and clear (I love this kind of definition 😌). Three.js is a library built on top of WebGL aiming to simplify the computer graphics development for the web. It has a lot of different features, including the support for Physically Based Rendering. Let's see the potential of this library. In this post I will show you how to create a simple physically base scene. At the end of this post you will have a scene like the one in the following image:
The mesh We will use are a simplified version of the ones available from
the Stanford scan repository in PLY format.
Let's start from the setup. We can use a simple html page, similar to the one described in the three.js doc (shown
below). We will put our assets (mesh, textures etc.) in the folder /assets/models.
<!DOCTYPE html>
<html>
<head>
  <meta charset="utf-8">
  <title>My first three.js app</title>
  <style>
    body {
      margin: 0;
    }

    canvas {
      width: 100%;
      height: 100%
    }
  </style>
</head>
<body>
<script src="js/three.js"></script>
<script>
  // Our Javascript will go here.
</script>
</body>
</html>
The first thing we will need to create is a Scene. We will also need to create a Camera, a TextureLoader for
texture loading, a PLYLoader to load our PLY meshes and a WebGLRenderer. Finally we will need an instance
of OrbitControls, a three.js extension that we use to orbit around the scene.
var scene = new THREE.Scene();
var camera = createCamera();
var textureLoader = new THREE.TextureLoader();
var plyLoader = new THREE.PLYLoader();
var renderer = createRenderer();
var controls = createOrbitsControls(camera, renderer);
For the camera, we create a PerspectiveCamera. As the name says, it uses
the perspective projection
to simulate the human eye views (this is one of the two main camera type used in computer graphics along
with orthogonal projection
. We place the camera in front of the scene, and we set the
vertical field of view FOV of the
viewing frustum to 75 degrees, the aspect ratio using the current width and height of the window,
the near and far plane of the viewing frustum
respectively to 0.1 and 1000 (to avoid the discard of mesh added to the scene).
function createCamera() {

  var camera = new THREE.PerspectiveCamera(75, window.innerWidth / window.innerHeight, 0.1, 1000);
  camera.position.z = 8;
  camera.position.y = 0;
  camera.position.x = 0;

  return camera;
}
We create a renderer with the alpha property set to true, in case we want to integrate in another HTML page and we want
the background to be visible until the scene is loaded. We set
the gamma correction for input and output colors by
settings the properties gammaInput and gammaOutput to true. We also enable shadow mapping by
setting shadowMap.enabled to true, setting it to use
the percentage closer filtering
with bilinear filtering. Finally we set the
size of the renderer to the same size of the window where we will display the scene.
function createRenderer() {

  var renderer = new THREE.WebGLRenderer({ alpha: true });
  renderer.physicallyCorrectLights = true;
  renderer.gammaInput = true;
  renderer.gammaOutput = true;
  renderer.shadowMap.enabled = true;
  renderer.shadowMap.bias = 0.0001;
  renderer.shadowMap.type = THREE.PCFSoftShadowMap;
  renderer.setSize($(window).width(), $(window).height());

  return renderer;
}
Next we setup the OrbitControls instance to manage an automatic rotation around the scene. You can customize this
function to let the user manage the movement with keyboard or touch control (on mobile 📱).
function createOrbitsControls(camera, renderer) {

  var controls = new THREE.OrbitControls(camera, renderer.domElement);
  controls.enableZoom = false;
  controls.autoRotate = true;
  controls.enablePan = false;
  controls.keyPanSpeed = 7.0;
  controls.enableKeys = false;
  controls.target = new THREE.Vector3(0, 0, 0);
  controls.mouseButtons = {};
  controls.dispose();

  return controls;
}
Now we can add the renderer to the DOM (we attach it to the body) of the page. We can now start to customize the scene by setting the background color to indaco (0x303F9F) (remember: the recommended way to set color in three.js is by HEX value). We can then add the main light and the hemisphere light.
//Add rendering dom element to page.
document.body.appendChild(renderer.domElement);

//Setup scene.
scene.background = new THREE.Color(0x303F9F);
scene.add(createLight());
scene.add(createHemisphereLight());
We create the main light as a point light using the PointLight class. In the constructor we set its color to white,
its intensity to 1 (default), 20 for the distance from the light where the intensity is 0, and finally the decay to 2 (
this is the amount the light dims along the distance of the light, and must be set to 2 for physically base light).
We then set its power as the same of a 100 Watt
bulb (1700 Lumen) light and we place it above the scene, to
create some sort of street light effect (light beam from above). We also active the ability to cast generate shadow by
setting castShadow to true, we force the shadow map size to 512x512 pixel (to increase performance, as the default is
- and we give a little blur on the shadow by setting the
radiusproperty to 1.5. We also create a geometry and a material for the light:
- the geometry is a sphere with radius 0
- the material is a complete emissive physically based material
In fact, the MeshStandardMaterial is the three.js implementation of a physically based material (so it's real:
three.js rocks with physically based rendering 😮).
function createLight() {

  var lightGeometry = new THREE.SphereGeometry(0);

  var lightMaterial = new THREE.MeshStandardMaterial({
    emissive: 0xffffee,
    emissiveIntensity: 1,
    color: 0x000000
  });

  var light = new THREE.PointLight(0xffffff, 1, 20, 2);
  light.power = 1700;
  light.castShadow = true;
  light.shadow.mapSize.width = 512;
  light.shadow.mapSize.heigth = 512;
  light.shadow.radius = 1.5;

  light.add(new THREE.Mesh(lightGeometry, lightMaterial));
  light.position.set(0, 5, 3);

  return light;
}
For the hemisphere light, we create it using the HemisphereLight class. We set the sky color to dark blue (0x303F9F),
the ground color to black (0x000000) and its intensity to 1.
function createHemisphereLight() {

  return new THREE.HemisphereLight(0x303F9F, 0x000000, 1);
}
Now we can start to add the stars, the PLY mesh models and the floor mesh model. Each mesh model is added to the scene at the end of its load method.
//Load models.
loadStars(textureLoader, function(stars) {

  scene.add(stars);
});

loadPlyModelUsingPhysicalMaterial(
  plyLoader,
  'assets/models/lucy.ply',
  {
    color: 0x3F51B5,
    roughness: 0.5,
    metalness: 0.7,
    clearCoat: 0.5,
    clearCoatRoughness: 0.5,
    reflectivity: 0.7
  },
  new THREE.Vector3(3, -3, 0),
  new THREE.Vector3(0, -Math.PI / 3.0, 0),
  function(mesh) {

    scene.add(mesh);
  }
);

loadPlyModelUsingPhysicalMaterial(
  plyLoader,
  'assets/models/dragon.ply',
  {
    color: 0x448AFF,
    roughness: 0.1,
    metalness: 0.9,
    clearCoat: 0.0,
    clearCoatRoughness: 0.2,
    reflectivity: 1
  },
  new THREE.Vector3(-3, -3, 0),
  new THREE.Vector3(0, -Math.PI, 0),
  function(mesh) {

    scene.add(mesh);
  }
);

loadPlyModelUsingPhysicalMaterial(
  plyLoader,
  'assets/models/bunny.ply',
  {
    color: 0xCCFFFF,
    roughness: 0.9,
    metalness: 0.1,
    clearCoat: 0.0,
    clearCoatRoughness: 0.5,
    reflectivity: 0.1
  },
  new THREE.Vector3(0, -3, 1.5),
  new THREE.Vector3(0, -Math.PI, 0),
  function(mesh) {

    scene.add(mesh);
  }
);

loadFloor(textureLoader, function(mesh) {

  scene.add(mesh);
});
For the stars, we use the textureLoader to load a circle png texture. When the texture load is completed, we create a
lot of Geometry objects with random position. We also create the material using the texture obtained from the loader (
and we set on it a transparent background). Now we can create some Points objects using the specific three.js class.
function loadStars(textureLoader, completeLoad) {

  textureLoader.load("assets/models/textures/circle.png", function(texture) {

    var starsGeometry = new THREE.Geometry();

    for (var i = 0; i < 10000; i++) {

      var star = new THREE.Vector3();
      star.x = 2000 * Math.random() - 1000;
      star.y = 2000 * Math.random();
      star.z = 2000 * Math.random() - 1000;

      starsGeometry.vertices.push(star)
    }

    var starsMaterial = new THREE.PointsMaterial({
      color: 0x888888,
      map: texture,
      transparent: true,
    });

    var stars = new THREE.Points(starsGeometry, starsMaterial);

    completeLoad(stars);
  });
}
For the PLY models, we use the PLY loader to obtain the corresponding geometry. Then we create a MeshPhysicalMaterial
using the parameters received. We also set the position and rotation of the mesh and we force the update of the local
transform using the updateMatrix() method. We set castShadow to true, as we need that this meshes are considered in
shadow mapping. We finally set also matrixAutoUpdate to false, as we don't need to recalculate the position of the
mesh on each frame (our meshes are static).
function loadPlyModelUsingPhysicalMaterial(plyLoader, path, parameters, position, rotation, completeLoad) {

  plyLoader.load(path, function(geometry) {

    var material = new THREE.MeshPhysicalMaterial(parameters);
    var mesh = new THREE.Mesh(geometry, material);
    mesh.position.set(position.x, position.y, position.z);
    mesh.rotation.set(rotation.x, rotation.y, rotation.z);
    mesh.castShadow = true;
    mesh.matrixAutoUpdate = false;
    mesh.updateMatrix();

    completeLoad(mesh);
  });
}
For the floor, we use again the textureLoader to load a texture of a marble surface. We then set the wrapS
and wrapT property to RepeatWrapping, to have the texture repeated on the entire surface. We then create
a MeshStandardMaterial, that is the base material for MeshPhysicalMaterial, and so it is also a physically based
material. We finally set also here the position, rotation and matrixAutoUpdate to false.
function loadFloor(textureLoader, completionFunction) {

  textureLoader.load("assets/models/textures/marble.jpg", function(texture) {

    texture.wrapS = THREE.RepeatWrapping;
    texture.wrapT = THREE.RepeatWrapping;
    texture.repeat.set(100, 100);

    var floorMat = new THREE.MeshStandardMaterial({
      roughness: 0.7,
      metalness: 0.1,
      map: texture
    });

    var floorGeometry = new THREE.PlaneGeometry(1000, 1000);
    var floorMesh = new THREE.Mesh(floorGeometry, floorMat);
    floorMesh.receiveShadow = true;
    floorMesh.rotation.x = -Math.PI / 2.0;
    floorMesh.position.y = -3;
    floorMesh.matrixAutoUpdate = false;
    floorMesh.updateMatrix();

    completionFunction(floorMesh);
  });
}
We are ready to render our scene. We just need to create the rendering loop with the following code:
var render = function() {

  requestAnimationFrame(render);
  controls.update();
  renderer.render(scene, camera);
};
You can find the entire scene code is this github gist.
Yeah!!! You made it!! You create a 3D computer graphics web application using three.js 😊!! And it is also a scene
that supports advanced feature, in particular physically based rendering 😮!!

You know three.js now. You're ready to conquer the web 3D world now 😏. Ah!! I was forgetting: you can find a live demo of the scene we created on the homepage of my website.